A guide for the TSHOOT Exam
For the TSHOOTv2 exam we will encounter:
+ 2 Simlets (small troubleshooting sim)
+ Multiple Choice Questions & Drag Drop Questions
+ 12 Troubleshooting Tickets (check them at the right-side menu)
Notice that in the exam, the tickets are randomly given so the best way to troubleshooting is to try pinging to all the devices from nearest to farthest from the client until you don’t receive the replies.
In each ticket you will have to answer three types of questions:
+ Which device causes problem
+ Which technology is used
+ How to fix it
One more thing to remember: you can only use “show” and “ping” commands to find out the problems and you are not allowed to make any changes in the configuration. In fact, in the exam you can not enter the global configuration mode!
Screenshots for your reference:
(Please visit Share your TSHOOT v2.0 Experience for bigger images)
Also you can find more information about TSHOOT exam in TSHOOT FAQs and Tips.
Guideline to use Troubleshooting Tickets on networktut.com
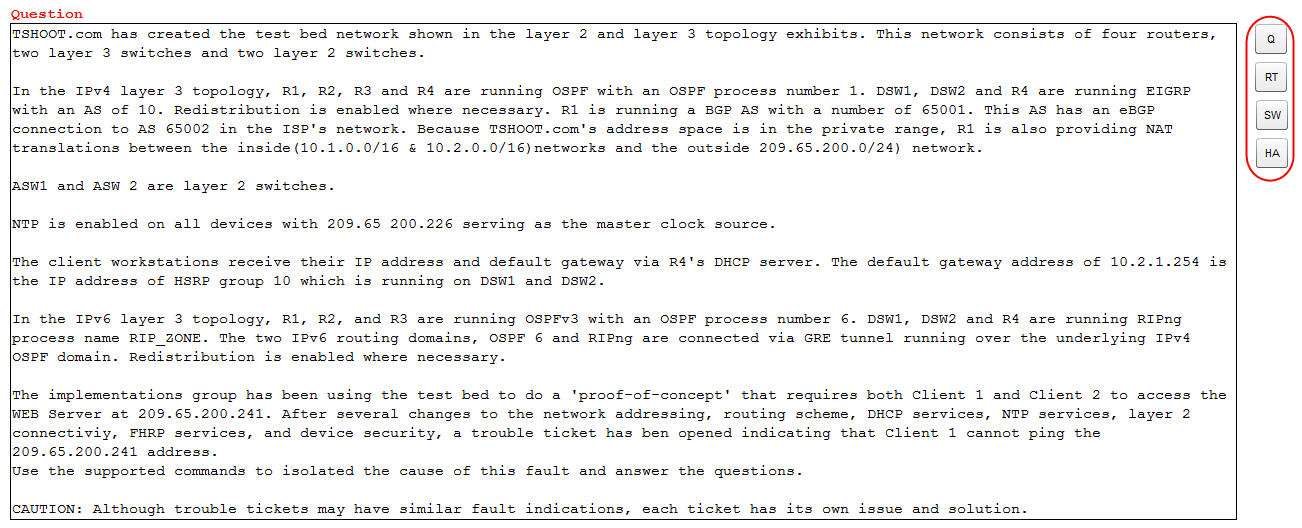
When you access a Ticket (for example https://www.networktut.com/final_flash/flash_simulator/Premium_Sims/TSHOOT_Tickets/Ticket1/ml_ticket1.html) you will see this interface:
Note: If you cannot see the output above, please make sure you have installed latest Flash plugin at https://get.adobe.com/flashplayer and enable it on your web browser.
Most of the tickets have the same questions but different errors (it is also true in the real exam). In each ticket you can type your commands to get the information you need to answer them.
After entering each ticket, please have a look at the right-hand side. Do you see the 4 buttons? Please click on the 4 buttons on the right-hand side to access the CLI of each device.
Please have a look at the screenshot above:
– The first button (“Q”) represents the question (as the text you are reading here).
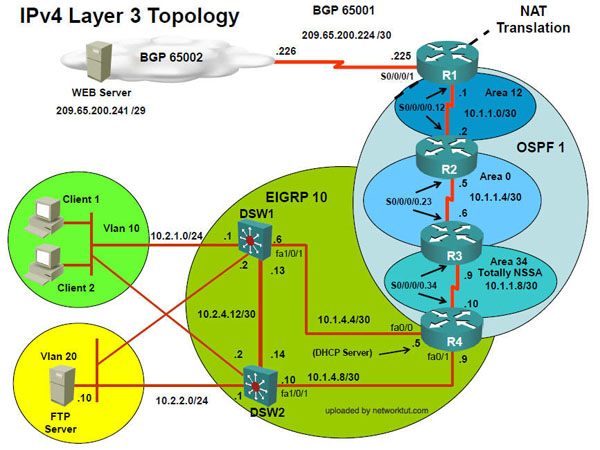
– The second button (“RT”) represents the Command Line Interface (CLI) of four routers from R1 to R4. After click “RT” button, you can type commands to the corresponding textboxes to get information about four routers.
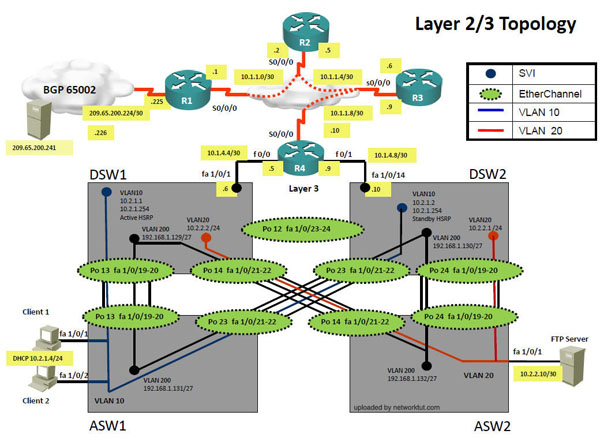
– The third button (“SW”) is used to get information about four switches DSW1, DSW2, ASW1 and ASW2.
– The fourth button (“HA”) represents the CLI of two hosts Client1 & Client2. This is also the place where you can choose your answers to describe the problem of this ticket.
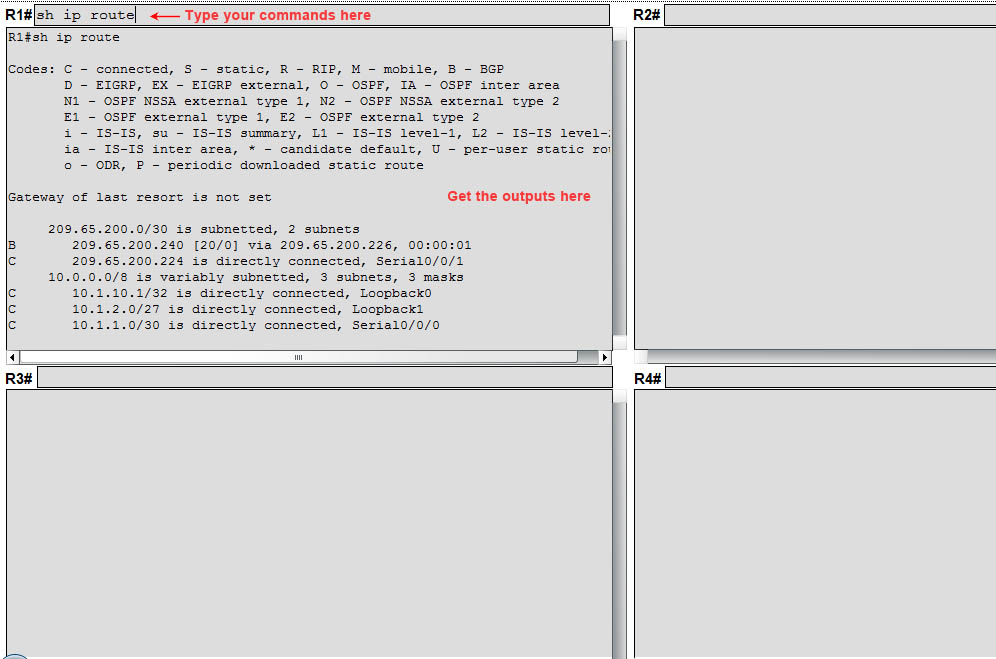
After clicking”RT” or “SW” or “HA” button you will see the CLIs of these devices. Here you can starting typing your commands to get the outputs to answer that ticket.
Supported commands
The simulators on networktut.com support the following commands:
| Router | Switch |
| show run show cdp neighbor show ip route show ip int show ip int brief show ip protocols show ip ospf show ip ospf neighbor show ip ospf interface show ip ospf database show ipv6 route show ipv6 ospf neighbor show ipv6 ospf interface show ipv6 ospf database show ipv6 ospf show ipv6 interface brief show ip eigrp interface show ip eigrp neighbor show ip eigrp topology show interface <interface> show ip bgp show ip bgp summary show ip bgp neighbor show ip access-lists/show access-lists show frame-relay map show ntp status show ntp associate ping |
show run show cdp neighbor show ip route show ip int show ipv6 route show ipv6 neighbor show ip eigrp neighbor show ip eigrp topology show ip int brief show ipv6 eigrp interface show ip eigrp neighbor show ip protocols show int trunk show interface vlan<number> show interface <interface> show vtp status show spanning-tree show vlan show track show standby show etherchannel show etherchannel port-channel show etherchannel summary show ntp status show ntp associate ping |
Note: These commands are not supported in the exam: “show interface status” (on switch), “ipconfig /all” (on clients).
You can also check which commands are supported on each device by typing “?”on each device.